Is your spouse or sibling celebrating a special 40th or 50th birthday this year? Or are your parents celebrating a special anniversary? If you are searching for an original gift idea that’s unique, memorable, and amusing, a photo collage is the perfect gift for that special someone who already has everything.
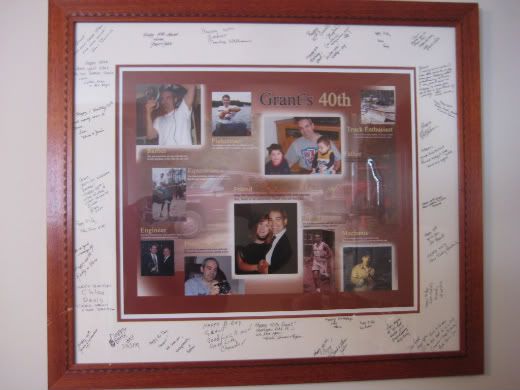
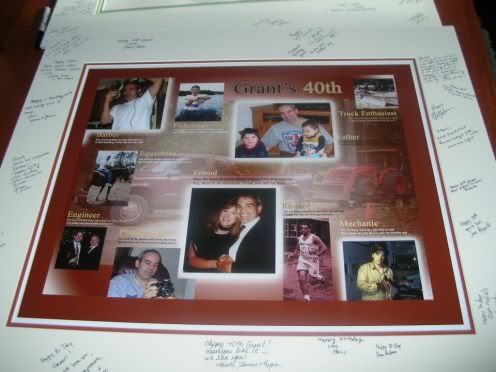
For my husband’s 40th birthday, I decided to create a collage of pictures taken throughout our years together. I added some comical captions, laid it all out Adobe®Photoshop® and had it printed and matted at a custom frame shop. I displayed it at his party. While the guests had a chance to enjoy the picture, they took a moment to sign the mat. After the party, I had the picture custom framed, and it hangs in our bedroom. He was very surprised and he absolutely loved it. Here is how I did it:
Collect Your Photos
My husband ironically happens to be the photographer in the family. He has saved digital photographs on our computer since the year 2000. These are saved in folders by date. How fortunate for me! I was able to find some great shots of him wearing his many “hats”.
There are many ways to save and transfer photos these days. You could email them to your source, save them to a SanDisk (memory stick) or save them to a CD. I saved mine to a memory stick and saved them onto my desktop. I did locate some photos that were of the ancient 35mm variety, and I scanned these into files in my desktop pc.
Develop a Theme
This is where the fun comes in. Hopefully you can easily create a theme from your photographs. For instance, there are many photographs taken over the years of my Dad sleeping! (This could be the theme of the collage I could make for his 70th birthday.) In my husband’s case, he has many interests and hobbies (toys) and that’s where my idea of his wearing his many hats became my theme.
Create Some Captions
Here’s another opportunity for you to show off your talent and get yourself published (so to speak). I created a word file of some captions that I added to my husband’s photographs. I will share with you some of the better ones. He ran the Boston Marathon several times, and I have a photo of him running, the caption reads: “Runner: You ran many marathons and then you met me, I taught you the art of being sedentary.” Here’s another: “Mechanic: You fix many vehicles, you look so cute, With grease on your face in your tan monkey suit.” Okay, to know him is to love him, but you get the idea. You may decide not to add any text, and to simply let the picture tell the story.
Design it in Adobe®Photoshop®
I designed my collage in Adobe Photoshop. Photoshop is the industry standard image editing program. Perhaps Photoshop is already included in your tool chest of graphics applications, if not, you can easily purchase and learn the program. There are free Photoshop Tutorials all over the Internet. Refer to sketchpad.net for some excellent tutorials that will get you started.
One of Photoshop’s most powerful features is its use of layers. Each layer in a Photoshop document is a separate image, which can be edited apart from any other layer.
My first layer is a photograph of my husband’s pride and joy, his 97’ GMC one ton dually diesel transporting his Kubota compact tractor. (It’s all about the toys right?) I added a nice manly brown border around this photograph. This background layer fills the entire picture. I created a new layer and added the title “Grant’s 40th. Next, I created a new layer and dropped in the first small photograph. I continued to add all the pictures, creating new layers each time. Because these are all separate layers, I could edit each photograph, without affecting my background, easily. Once I placed the pictures in the right locations, exposing enough of the background photograph, I started to add my captions. Each caption, also has it’s own layer. For interest, I formatted some text in black and some text in white. For a few of the photos, I added a white halo effect to the outer edges. Check out this site for some very cool Photoshop Special Effects Tutorials.
Once I was happy with my picture, I saved my file as a “tif” file, so all of the information was saved, and the image was not compressed. I transferred this file onto my memory stick.
Print and Mat Your Finished Product
I found a local frame shop called Custom Frame Works. The frame shop has an Epson 9800 wide format printer, which prints up to 44” wide. I wanted a good size picture for our wall, and printing my 20” x 24” photo, from my tif file, was no problem. It cost me $50.00. I was very happy with the excellent, crisp quality of the photo. After consulting with the owner on the right mat and frame, my image was matted. I was ready for the party!

Display Your Matted Photo for your Guests to Sign
I displayed the matted photo on a large dining room table for all of the guests to sign. Make sure to have some good quality ink pens on hand for people to sign with. He now has some great nuggets of wisdom on aging like: “Life begins at 40.” And “40 is good.” Well, if nothing else, as he ages, the signatures can help him recall who was at his party.
Frame It
I returned to Custom Frame Works and had my signed photo collage framed. The cost of the mat and framing was about $150. The cost will vary based on your picture size, and your mat and frame selections.
With a little creativity, anyone with some basic PC and Photoshop skills can design a nice (original)photo collage. Your special gift will be remembered for years to come!


 Facebook
 Twitter

2 comments:
I love this idea! I am one of the lucky people who have seen this in person! The pictures you have in the collage really represent your husband well. What a great keepsake!
oh this is great to know - thanks for sharing!
Post a Comment